So, you’ve heard great and wonderful things about PowerShell and now you’re seriously considering it for your day-to-day, eh?
Well, good!
You should!
But before you drink the Kool-Aid, you’ve probably got some doubts, concerns, and questions. I’m sure one of those, lurking in the back of your mind, is something along the lines of:
“Can I customize my PowerShell prompt?”
Allow me to answer you with a meme:

With that doubt soundly purged from your mind, you may now find yourself wondering if you can get your PowerShell prompt looking like all those fancy “powerline” prompts you’ve probably seen in screenshots out there. You’re wondering…
“How far could I take this?”
Answer: About 4.3 lightyears (give or take).

Okay, so maybe putting a number on it, measured at a hypothetical relative velocity, wasn’t technically correct, but it makes a heck of a point: you can take PowerShell customization way, WAY beyond what anyone would dare consider sane!
Now that you know just about anything’s possible, how do you do it? The short version is this:
- Find your
$PROFILEon disk. - Override the default
promptfunction with your own. - Profit!
The $PROFILE and the prompt
Upon startup, PowerShell looks for a special file for the user executing the process called a profile. This is a plain-text file, written in PowerShell’s own scripting language, that allows the user to set a great many things like environment variables, aliases, custom functions, and yes, even their shell prompt.
To get started you need to find where your specific user profile (file) is located on disk.
Locating Your $PROFILE
The location of this file may vary based on platform and configuration, so the easiest way to find where pwsh wants yours to be is just to ask it!
$ pwsh
PowerShell 7.1.5
Copyright (c) Microsoft Corporation.

https://aka.ms/powershell
Type 'help' to get help.

PS > $PROFILE
/Users/jah/.config/powershell/Microsoft.PowerShell_profile.ps1
In this example, since I’m on MacOS and my $HOME is under /Users/jah, we can see that PowerShell is looking for the file in its default location on my platform. Linux users will likely see almost the same thing, with /home in place of /Users.
Be aware that the string output you get from $PROFILE doesn’t necessarily prove that the file itself actually exists; this is just the setting that PowerShell has internally. This is just where it’s going to look. It’s still UP TO YOU to create that file.
If this file doesn’t yet exist in the location PowerShell expects, just create it yourself. A quick touch $PROFILE from within PowerShell should do the trick rather easily. (You might need to create the $HOME/.config directory if it doesn’t already exist.)
Your $PROFILE file is nothing more than a plain-text UTF-8 encoded file with LF line endings (on *nix systems). You can put as much code, comments, and such in here as you want over the course of time that you use PowerShell. Consider making it part of your “dotfiles” configuration backup/persistence strategy. (Lots of folks find success using personal, private GitHub repositories for that. Just be sure not to commit secrets to history!)
The prompt function
Every time PowerShell needs to show you a prompt, it runs a specially-named function simply called prompt. If you don’t define this yourself, PowerShell uses a built-in default function that is extremely plain and minimal. This is the function we’re going to overwrite.
Let’s kick things off by overriding prompt with our own function: a very simple tweak to change the prompt’s output text color.
Before we proceed, a quick note on terminal emulators. I’m using iTerm2 (which is also what renders the stats bar at the bottom) on MacOS with the SF Mono font (which is, I think, Apple proprietary). It doesn’t contain emoji unicode symbols, so I’ve supplemented that with a Nerd Font, ligatures enabled. You Windows folks should try the new Windows Terminal from Microsoft, and you Linux users out there have more choice in this department than you could shake a stick at. Point is, your choice of terminal, and its configuration, are your responsibility.
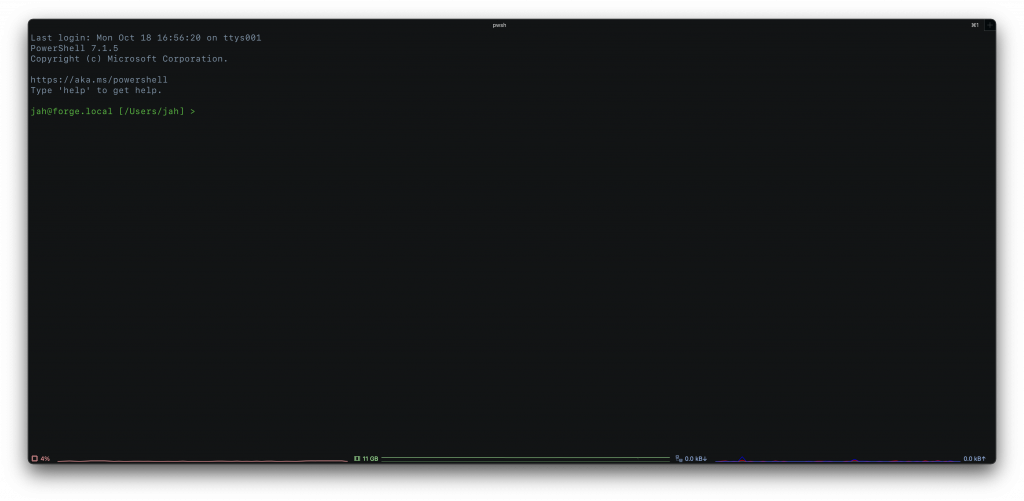
Open your $PROFILE file in your favorite text editor and write your own prompt function. Start with this, just to get your feet wet:
function prompt {
  Write-Host ("$env:[email protected]$(hostname) [$(Get-Location)] >") -NoNewLine -ForegroundColor $(Get-Random -Min 1 -Max 16)
  return " "
}
This code was originally from Microsoft’s docs; I’ve made only minor tweaks to it, nothing more.
Here’s a screenshot of what this looks like in my case using iTerm2 on MacOS:
Now, this isn’t very exciting, but notice something: we’ve told PowerShell to choose a NEW COLOR at random every time it draws the prompt. So hit enter a few times and you get proof that this function runs every time PowerShell is ready for input:
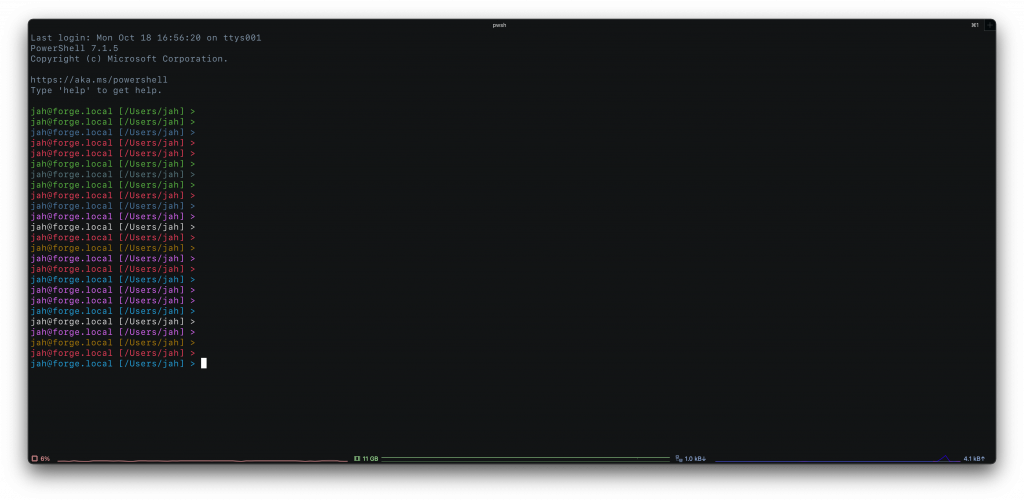
Sure, pretty colors are nice, but this isn’t all that useful yet. Let’s power this up.
A Powerline Prompt With Oh-My-Posh
Give your terminal a good jolt by setting up a nice powerline prompt with a utility called oh-my-posh.
Here’s a sample of what that might look like:
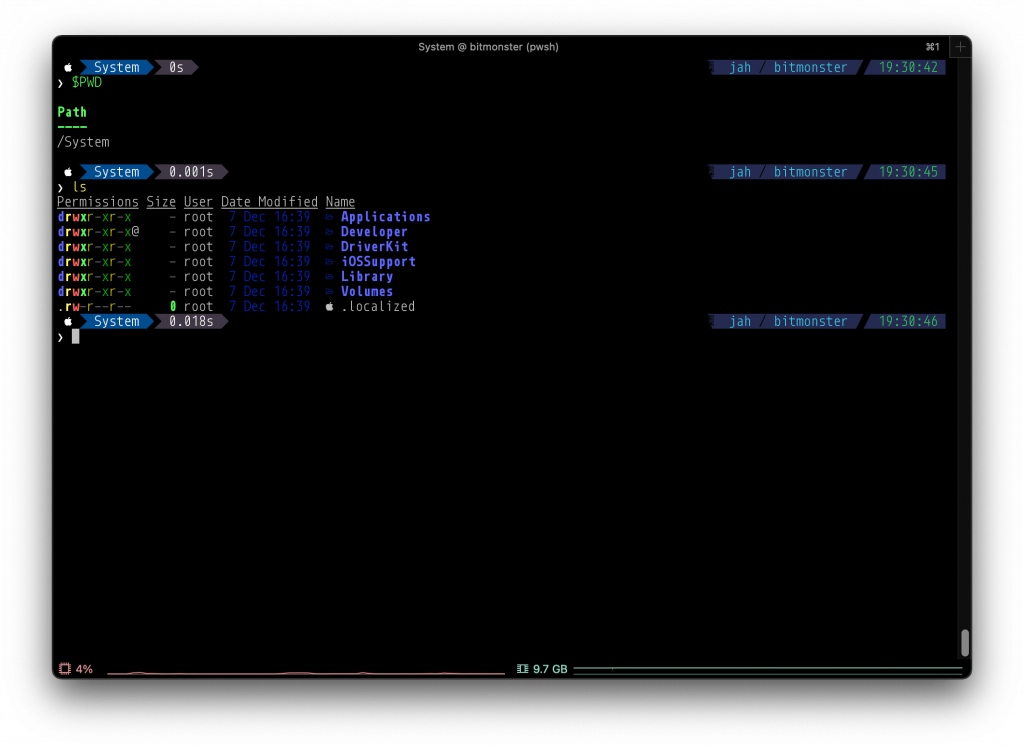
/System directory on my Mac workstation. My ls command is actually a function I’ve definedin my PowerShell
$PROFILE that delegates to the awesome exa utility under-the-hood as a pseudo-replacement for /bin/ls.This way I can “replace”
ls for personal use without the consequences of altering the original and its behavior/output (scripts, etc.).Install Oh-My-Posh
As the oh-my-posh website explains, OMP is a shell agnostic tool that allows you to configure your prompt not just for bash, zsh or even just PowerShell, but any shell that works roughly the same way. This means you can have one configuration to define your prompt, then switch between all three aforementioned shells as you like and get the same prompt with all of them!
So visit the oh-my-posh docs and install OMP for your platform. In my case, this was a series of simple Homebrew commands (brew tap and brew install) that can be copy-pasta’d from the documentation (as of this writing).
BE ADVISED: Ignore Install-Module; Outdated
Just because you can doesn’t mean you should. As with life in general, going down “easy street” will usually bite you in the posterior later on. Same here; don’t fall for it!
You may find outdated documentation elsewhere on the web referring to oh-my-posh as a PowerShell-only utility, or telling you to install it directly through PowerShell viaInstall-Module. DO NOT DO IT THIS WAY. That’s an old, outdated approach back from the days when Oh-My-Posh used to be only for PowerShell. That is no longer the case and installing it this way may be unsupported at any point in the future, so you’re better off avoiding this method entirely, even if you never intend to use anything other than PowerShell.
Themes
Oh-My-Posh itself provides the ability to make your shell pretty, but for the actual “pretty stuff” itself, you need
a compatible theme. Thankfully, OMP distributes a number of very nice, useful themes along with its install that you can re-use or copy-and-tweak to your liking.
If you’re following the brew installation route, you can see those themes in their original, distributed state by asking brew where that is:
brew --prefix oh-my-poshNow, just tack /themes on the end of whatever that command gives you, and boom! There’s the plethora of themes you can choose from to get started.
In my case, I started with the theme blue-owl.omp.json, but with one tweak: I changed the value for osc99 from true to false. Why? Because that’s telling iTerm2 to sound an audible bell noise every time the theme gets loaded. So in my workflow, that meant that every time I opened a new terminal tab I’d hear that annoying beep noise! Not cool! So I just flipped the bit to remove that annoyance! I wish all life’s annoyances could be so easily eradicated…
You can do the same thing I did, starting with an existing theme, then making small tweaks, or you could go much further with your customizations. However you decide to do things, just make sure you COPY the existing theme file to a new location, instead of overwriting the original! This is because your installation method of choice – Homebrew, in this example – will likely overwrite your changes when it next updates OMP. Then you’d have to restore from backup, or do this all over again! Not what I typically want to be doing on a Saturday afternoon, ya know?
PowerShell Integration
With your theme selected, that JSON file is copied and tweaked to your liking, then saved elsewhere on disk (I chose $HOME/.config), now you can modify the previously mentioned $PROFILE file on disk to tie these things together.
Open up a new PowerShell session and ask it for the path to your $PROFILE on disk again:
> $PROFILE
/Users/jah/.config/powershell/Microsoft.PowerShell_profile.ps1
Sample output only. Your path/response will vary.
Open that file in your text editor of choice. Now, assuming you have NOT already altered your $PATH environment variable to tell PowerShell where to find stuff installed via Homebrew (or other package manager), you can do something like this to construct an array for that value:
# Set Paths
$pth = (
  "$Home/.bin",
  "$Home/.brew/bin",
  "$Home/.brew/sbin",
  "$env:PATH"
)
$env:PATH = ($pth -Join ':')
This is an example only, taken from my personal configuration. I keep one-off scripts/code in
~/.binas symlinks to other things so I can rename commands, etc. (e.g.nvim -> vim) without actually renaming the files themselves or having to create aliases by modifying code (just a convenience). And I install Homebrew in$HOME/.brewso that
it won’t need full disk access. It’s more secure, and in something like 10 years it’s never once actually broken anything for me, even though the Homebrew authors explicitly advise against doing it this way. But that’s just me – you do you!
Be sure you do this BEFORE invoking any call to oh-my-posh. Otherwise, the shell will have no idea what you’re talking about and you’re gonna have a bad time.
With that in place, add the following line just below that snippet, before doing any further customization:
oh-my-posh --init --shell pwsh --config ~/.config/omp.theme.json | Invoke-ExpressionOf course, substitute the path provided to the
--configargument with the right path to YOUR configuration file.
With that done, save the file and open up a new PowerShell terminal session (new terminal tab).
You’ve now got a fancy new shell prompt in PowerShell!
What’s going on under the hood?
What the above command does is use the oh-my-posh binary, provided with arguments, to generate some PowerShell code. Then, that output is piped from within PowerShell to the Invoke-Expression function. This is essentially an eval() function for pwsh. It’s like saying, “Here’s some string data, now treat it as source code and run it.”
For that reason, an astute observer might find this approach a little uncomfortable, which is pretty understandable. If that’s you, I commend your security awareness and eagle-eyed nature. As a purely academic exercise, here’s the first piece of what that generated code looks like (I had to cut the screenshot because what it generates is kinda long, but you’ll see where I’m going with this):
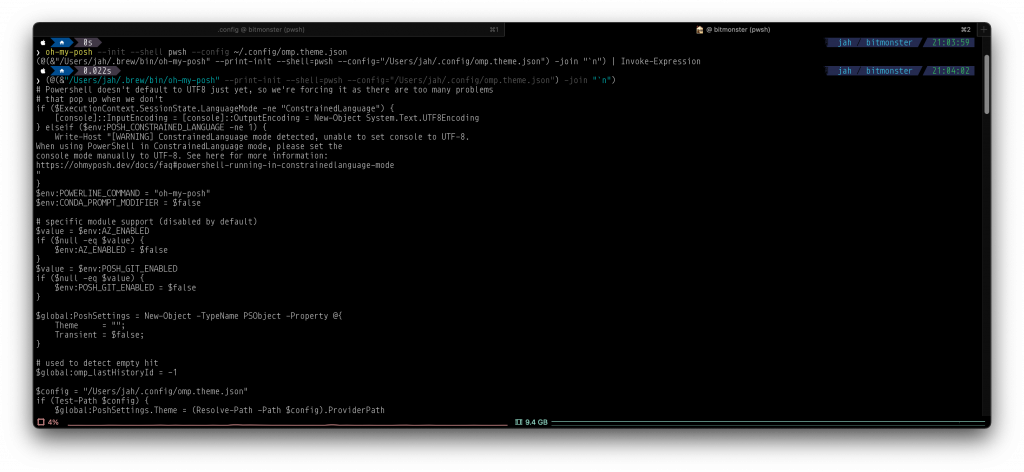
If you find the Invoke-Expression implementation uncomfortable, you could copy-and-paste that output into another
file somewhere, or even put it directly into your $PROFILE, to render attacks against that specific vector impossible. But the cost of doing that is convenient; you’d have to regenerate it every time OMP or the theme is updated, and possibly with some future PowerShell update as well if backward compatibility gets broken at some point. You’d also have to maintain the generated source code itself by backing up yet another file somehow/somewhere.
But that’s up to you. Personally, as long as I’m aware of the oh-my-posh binary on disk gets changed, I’m “comfortable enough” to run it this way. But it’s quite understandable if you don’t share my opinion on this matter. You wouldn’t be “wrong” whatsoever; perhaps “impractical”, but certainly not “wrong”.
Now What?
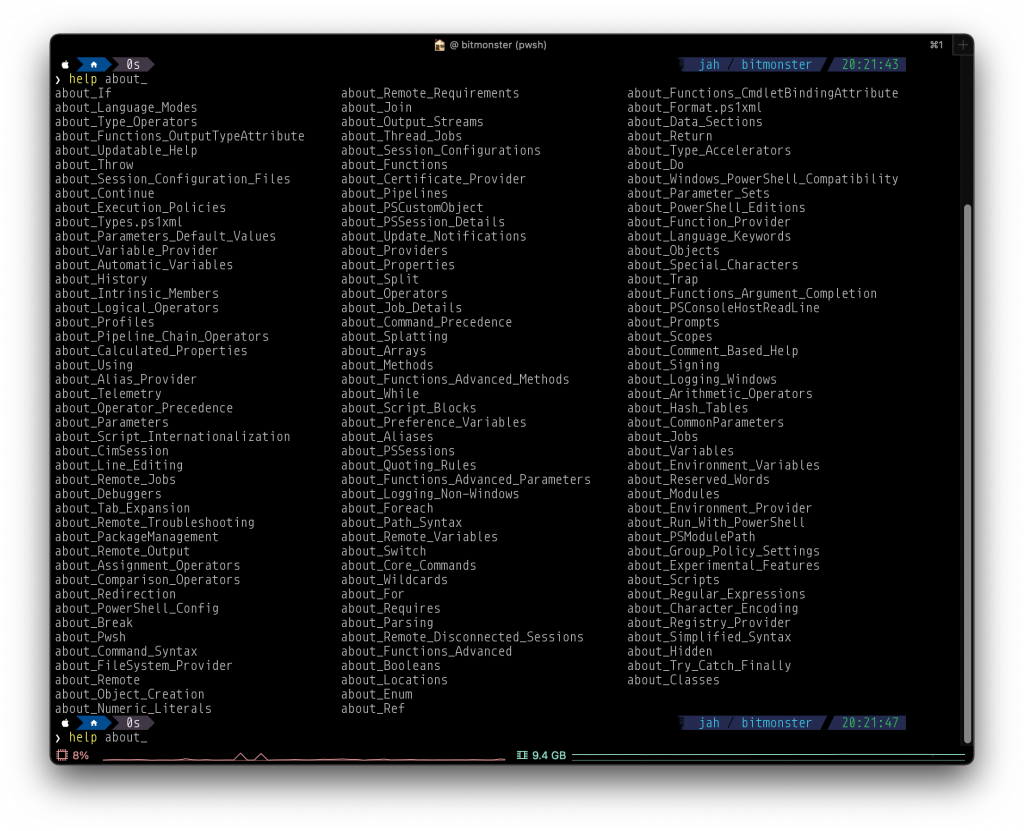
You’ve got your fancy prompt, so now what? I recommend taking a look at the built-in help documentation from within PowerShell itself to get started. At your (now snazzy!) prompt, do this:
- Type
help about_ - Now STOP. Do NOT press enter.
- Instead, whack that TAB key a few times and see what happens!
If you answer y, you’ll get a list of all the about_* files that ship with PowerShell. Each of these contains a very well-written overview of multiple features, settings, and other very useful bits of info on how to better use PowerShell to get stuff done.
Now all you need to do is figure out which file to view. If like me, you’re a privacy-conscious person, you might want to start with the entry on telemetry:
help about_TelemetryNext, perhaps you’d like to know more about how to configure PowerShell to your liking:
help about_ProfilesBut if you want to see where PowerShell really shines, check out the entry on Methods:
help about_Methods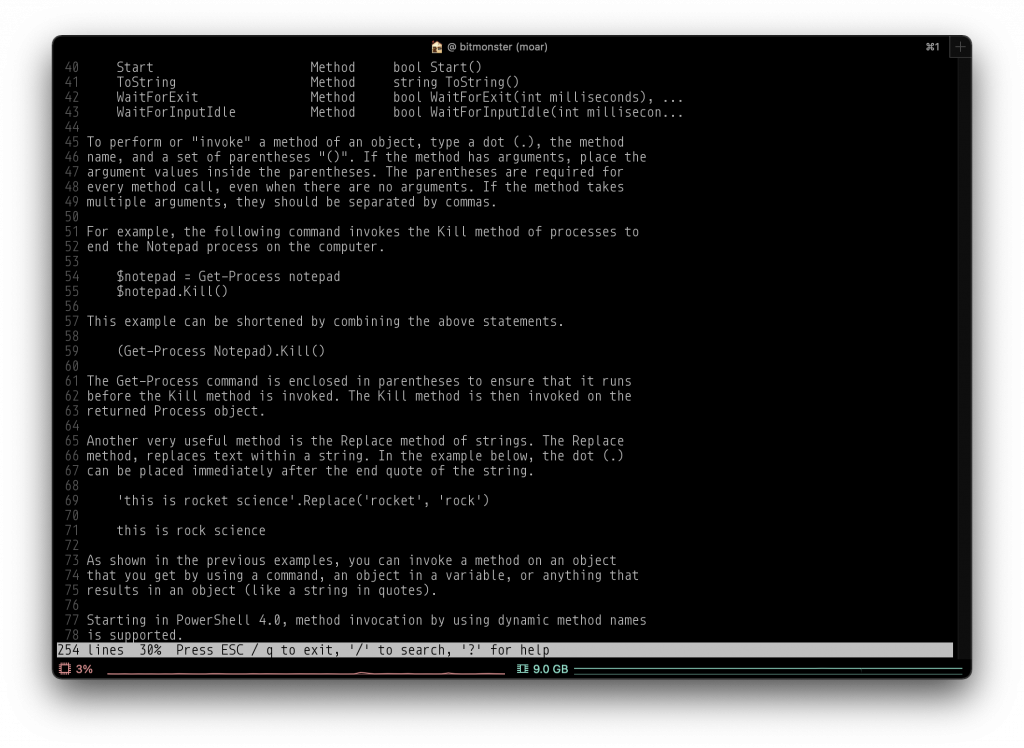
Variables, types, classes, methods – PowerShell has it all. The syntax is very approachable and will feel familiar to anyone with even the smallest amount of non-negligible programming experience. While there are a few variations in that syntax some consider odd, they’re very unobtrusive and in truth, it’s far easier to build shell scripts in PowerShell that are distributable and work consistently across implementation versions (and platforms!) than it ever would be using the esoteric vagaries of /bin/sh and friends, especially for those of us who haven’t been writing shell scripts since the days of UNIX System-V.
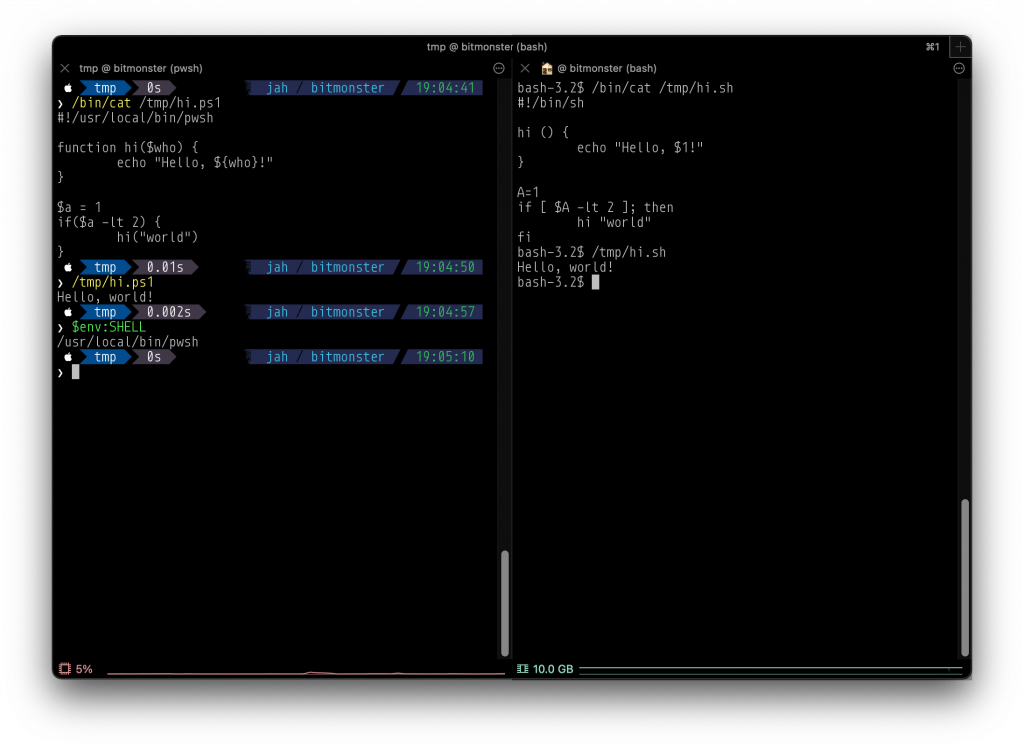
sh; note the brackets [ ], use of the then keyword, and instead of curly braces like dozens of other programming languages, sh uses a new line and fi – “if”, backwards – to end a conditional logic block. How is this in any way easy or approachable? By contrast, PowerShell draws on ubiquitous conventions and patterns you already know!While PowerShell isn’t as popular, especially outside of the Windows ecosystem, as its storied counterparts of UNIX legend, it’s more capable and has a much shorter learning curve. There’s certainly nothing wrong with using those shells of old, but why settle for a 9-volt battery when you can have a nuclear reactor?

Spread the word