Photo by Natalie Su on Unsplash
Why, hello there!
In a previous blog post I wrote about deploying EKS via the CLI eksctl command and then deploying v0.2.0 of KubeCF.
The post, like myself, has not aged gracefully.
This is a good news / bad news situation.
The good news is the KubeCF folks have continued to make the tool simpler, easier and better to use so a few tweaks are required to consume these changes. The bad news is home schooling my kids is leading to over eating and more gray hair taking over. One of these is easily fixed, so let’s dig in!
Using Terraform
In the previous blog I used eksctl to spin an EKS cluster. Nice tool, however I’ve tried to standardize on a single tool to configure AWS resources so I’ve switched to Terraform. In another blog post I covered how to deploy a simple EKS cluster with a Managed Node Group and Fargate Profile. It’s only a few lines of Terraform that rely on a few community repos.
To deploy KubeCF a few changes needed to be made:
- Bump the disk on the EC2 instance to 50GB
- Remove the Fargate Profile as it isn’t needed
Step 1 – Launch EKS

Photo by Bill Jelen on Unsplash
I’ve created a GitHub repo to deploy an EKS cluster specifically for KubeCF at https://github.com/cweibel/example-terraform-eks/tree/main/eks_for_kubecf, clone the repo and modify cluster.tf if you want a different version of Kubernetes or a different cluster name change the values accordingly:
locals {  cluster_name = "my-eks-cluster"
  cluster_version = "1.18"
}
Deploy the cluster with the following, swap in your own values for the AWS keys:
export AWS_ACCESS_KEY_ID=AKIAGETYOUROWNCREDS2
export AWS_SECRET_ACCESS_KEY=Nqo8XDD0cz8kffU234eCP0tKy9xHWBwg1JghXvM4
export AWS_DEFAULT_REGION=us-east-2
terraform init
terraform apply
Sit back and let it simmer for 20 minutes, no one said this would be fast! When done you’ll see a line similar to:
...
Apply complete! Resources: 60 added, 0 changed, 0 destroyed.
Now go ahead and configure your kubeconfig by running:
$ aws eks --region us-west-2 update-kubeconfig --name my-eks-cluster
Step 2 – Deploy KubeCF on the EKS Cluster

You know, you love it, let’s use it! In the subsequent steps you’ll be deploying KubeCF v2.6.1 which is the newest version as of this writing (10/27/2020).
Start by launching the cf-operator Helm Chart which takes in BOSH syntax yaml and turns it into Kubernetes yaml on the fly:
kubectl create namespace cf-operator
helm install cf-operator \
--namespace cf-operator \
--set "global.singleNamespace.name=kubecf" \
https://github.com/cloudfoundry-incubator/quarks-operator/releases/download/v6.1.17/cf-operator-6.1.17+0.gec409fd7.tgz \
--wait
Before skipping ahead, give the cf-operator pods time to spin up. The --wait “should” wait for all 3 pods to come as Running before the CLI returns. To verify the state run the following:
$ kubectl -n cf-operator get pods
NAME                                         READY   STATUS    RESTARTS   AGE
cf-operator-666f64849c-6ncwb                 1/1     Running   0          28s
cf-operator-quarks-job-65f9f7b584-sggs9      1/1     Running   0          28s
cf-operator-quarks-secret-867fcf579f-ff9cg   1/1     Running   0          28s
Now you can run the Helm command install KubeCF. The only variable which you’ll need to set is the system_domain. For this example I’m using system.kubecf.lab.starkandwayne.com since I have DNS control via CloudFlare:
helm install kubecf \
  --namespace kubecf \
  --set system_domain=system.kubecf.lab.starkandwayne.com \
https://github.com/cloudfoundry-incubator/kubecf/releases/download/v2.6.1/kubecf-v2.6.1.tgz
If you get an error similar to the following, you did not wait for the cf-operator pods to finish spinning up:
Error: unable to build Kubernetes objects from release manifest: [unable to recognize “”: no matches for kind “BOSHDeployment” in version “quarks.cloudfoundry.org/v1alpha1”, unable to recognize “”: no matches for kind “QuarksSecret” in version “quarks.cloudfoundry.org/v1alpha1”, unable to recognize “”: no matches for kind “QuarksStatefulSet” in version “quarks.cloudfoundry.org/v1alpha1”]
This step will take 20 or so minute to coalesce, when done it should look like:
$ kubectl get pods --namespace kubecf
NAME                                     READY   STATUS      RESTARTS   AGE
api-0                                    17/17   Running     1          10m
auctioneer-0                             6/6     Running     1          10m
bosh-dns-86c4557c69-8kmmw                1/1     Running     0          19m
bosh-dns-86c4557c69-trvb5                1/1     Running     0          19m
cc-worker-0                              6/6     Running     0          10m
cf-apps-dns-58bd59c444-49fgl             1/1     Running     0          20m
credhub-0                                8/8     Running     1          10m
database-0                               2/2     Running     0          19m
database-seeder-8dda20ebe6fa756f-jvzx2   0/2     Completed   0          19m
diego-api-0                              9/9     Running     2          10m
diego-cell-0                             12/12   Running     9          10m
doppler-0                                6/6     Running     0          10m
log-api-0                                9/9     Running     0          10m
log-cache-0                              10/10   Running     0          10m
nats-0                                   7/7     Running     0          10m
router-0                                 7/7     Running     1          10m
routing-api-0                            6/6     Running     0          10m
scheduler-0                              13/13   Running     1          10m
singleton-blobstore-0                    8/8     Running     0          10m
tcp-router-0                             7/7     Running     0          10m
uaa-0                                    9/9     Running     1          10m
Note that the version of the cf-operator and kubecf helm charts need to be kept in sync. Refer to the release notes of KubeCF versions to know the corresponding version of the cf-operator.
To make this a more “I would actually use this in production” see:
Configuring advanced features like Eirini and External Databases (for the 7 control plane databases) can be found at https://kubecf.io/docs/deployment/advanced-topics/. I encourage you to use an RDS instance for anything even close to a production environment.
See https://kubecf.io/docs/tutorials/run-smoke-tests/for instructions on how to run the cf smoke-tests.
Register DNS
There are 3 load balancers which are created during the deployment, the one I need can be viewed by:
kubectl get service router-public -n kubecf
kubecf        kubecf-router-public           LoadBalancer   172.20.50.146    a34d2e33633c511eaa0df0efe1a642cf-1224111110.us-west-2.elb.amazonaws.com   80:30027/TCP,443:30400/TCP                                                                                                                                     43m
You will need to associate the system_domain in helm install command to the URL associated with the LoadBalancer named kubecf-router-public.
In CloudFlare, I added a cname record pointing the ELB to the system_domain for my deployment:
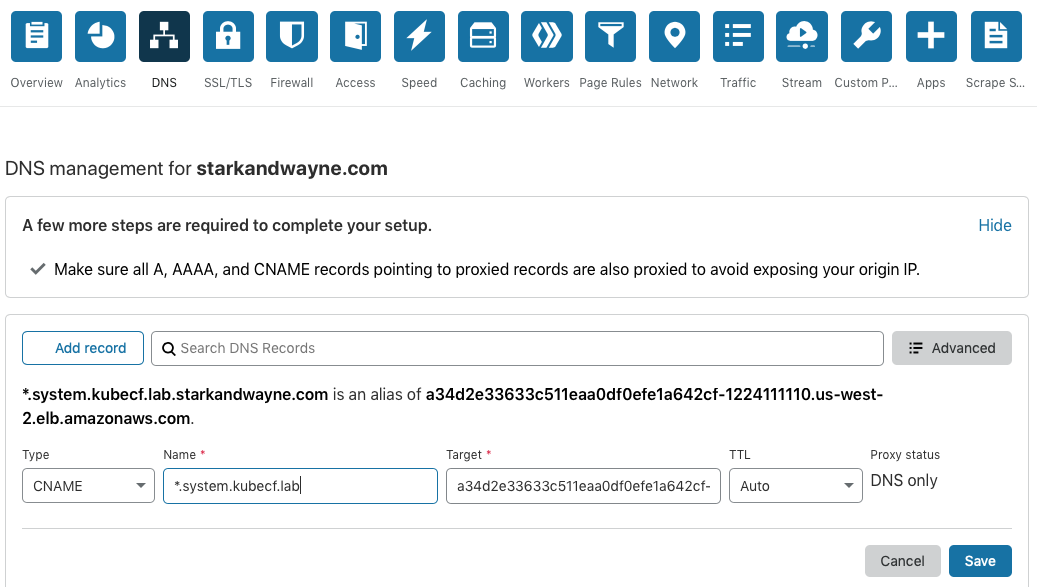
If you are using Amazon Route53, you can follow the instructions here.
Log into CF
Assuming you have the CF CLI already installed, (see this if not), you can target and authenticate to the Cloud Foundry deployment as seen below, remembering to update the system domain URL to the one registered in the previous step:
cf api --skip-ssl-validation "https://api.system.kubecf.lab.starkandwayne.com"
admin_pass=$(kubectl get secret \
        --namespace kubecf var-cf-admin-password \
        -o jsonpath='{.data.password}' \
        | base64 --decode)
cf auth admin "${admin_pass}"
That’s it! You can now create all the drnic orgs and spaces you desire with the CF CLI and deploy the 465 copies of Spring Music to the platform you know and love!
Tearing Down KubeCF + EKS

Photo by Mohamed Nohassi on Unsplash
This should be done in two steps, marshmallows and sticks are optional:
kubectl delete namespace kubecfwill clean up the pods and other resources, including the Load Balancer resources that would prevent the VPC from being removedterraform destroywill tear down the Managed Node Group, EKS Cluster, subnets and finally the VPC. If the first step was skipped this step may fail. Either rerun both or go into the AWS Console to clean up the VPC manually.
Running KubeCF on Kind
The folks on the KubeCF project already have an excellent write up on deploying KubeCF on Kind. Check out https://kubecf.io/docs/deployment/kubernetes-deploy/. A fair warning, you’ll need a computer with a bit of horsepower to run this locally but otherwise is great for getting a local copy of CF of your very own.
What’s Next?
Here are a few interesting blogs around KubeCF, check them out and come back to our blog for more!
- Dave’s blog on Installing KubeCF (v1.0.1) on RKE on vSphere https://www.starkandwayne.com//blog/cloud-foundry-on-rancher-where-to-begin/. Check out the section on adding the KubeCF namespaces to Rancher Projects.
- KubeCF install instructions from SUSE https://kubecf.io/docs/deployment/kubernetes-deploy/. Kind and Minikube instructions are here.
- Using EKSCTL https://starkandwayne.com/blog/getting-started-with-amazons-eks/, if you are passionate against using Terraform, there are other options.
- Deploying older KubeCF (v0.2.0) on EKS spun with EKSCTL: https://www.starkandwayne.com//blog/running-cloud-foundry-on-kubernetes-using-kubecf/, shameless plug for an old blog post I wrote!
Enjoy!

Spread the word