Is Cloud Foundry dead? I ask on your behalf because Pivotal – chief cheerleader and contributor to Cloud Foundry – was sold to VMWare in 2019, and all Pivotal-cum-VMWare staff chant “Tanzu” as the answer to all problems. During 2017, ’18, and ’19 the vendor ecosystem around “cloud” and “devops” seemed to pine for all things Kubernetes.
Cloud Foundry was not Kubernetes. It worked, sure. It was used by huge companies, great. It was actually used very successfully, at large scale, yes, that’s lovely. But it wasn’t Kubernetes. A normal person wanting to “try out Cloud Foundry” had to run it themselves. It was a huge thing to try running on your skinny laptop, and the BOSH toolchain for running it on a cloud was confusing and new to everyone.
Kubernetes was smaller, was popular, and it had a nice leveling up experience as you learned it. You could be successful early by deploying nginx pods, and you could keep learning more and more and always feel good about it. Kubernetes had gamified devops.
Cloud Foundry was not Kubernetes. But, this year it is. There are two parallel and converging efforts to bring Cloud Foundry to Kubernetes. Over the last few months, we have looked at KubeCF on this blog. KubeCF and Quarks are an attempt to bring old Cloud Foundry to new Kubernetes, by porting the BOSH releases to Kubernetes.
Today, we look at the new project cf-for-k8s which combines a new effort to make an all new Cloud Foundry that is native to Kubernetes. Does it work? Can you use it yet? Are the VMWare Tanzu people on to something golden? Let’s find out.
Update: the cf-for-k8s release team has published a blog post that covers a lot of important what/how/why.
Update: I’ve confirmed the tutorial included in this article works for cf-for-k8s v0.2.0 released early May 2020.
Table of Contents
What is cf-for-k8s and why is it version 0.1.0?
The Pivotal-cum-VMWare Tanzu staff who work on Cloud Foundry have pivoted, finally, and are full steam ahead moving Cloud Foundry to Kubernetes. What’s changed, and what are they trying to do?
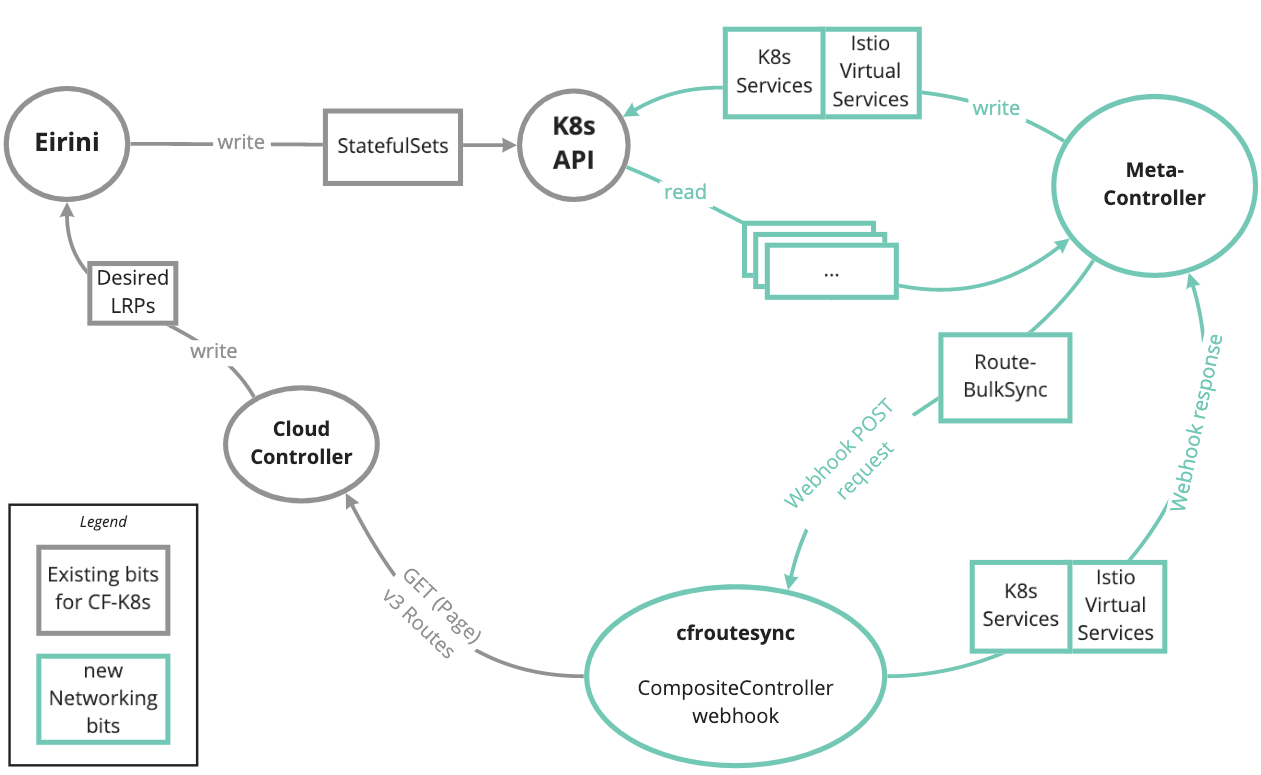
Bits are being thrown away (gorouter, loggregator), new bits are being written or rewritten, and importantly, a lot of bits are being used from the wider Kubernetes ecosystem, including Istio, Cloud Native Buildpacks, kpack, fluentd, metacontroller, plus all the solid gold that comes bundled with Kubernetes.
The new networking diagram below shows the green new pieces integrating with Cloud Foundry components Cloud Controller (the CF API), Eirini (Cloud Foundry apps running as Kubernetes pods), and Kubernetes itself.
The cf-for-k8s repository is the release management tool to bring all the old and new components together so they “Just Work”. Recently they released v0.1.0 which gives us our first look at the whirlwind efforts of 2020. How’s it looking? It’s looking great. I’m very excited.
VMware customers will run a commercial version of cf-for-k8s called Tanzu Application Service (TAS) which is now available for initial testing. The installation instructions for TAS look very similar to the installation instructions for open source cf-for-k8s so, you’ll learn a lot from this blog post.
Google Kubernetes
We need a Kubernetes. In this article, I’ll do everything on Google Cloud. The Kubernetes cluster, the static IP, and the container registry for Docker images.
Let’s use our time wisely and run a simple one-liner to provision our Google Kubernetes cluster (GKE):
git clone https://github.com/starkandwayne/bootstrap-kubernetes-demos
cd bootstrap-kubernetes-demos
export PATH=$PWD/bin:$PATH
bootstrap-kubernetes-demos up --google
This handy command will invoke a long gcloud container clusters create command with many flags set, will wait for the cluster to be provisioned, will set up local kubectl credentials, and will set up a cluster-admin role.
When it’s finished, check that kubectl is pointing to our new cluster.
$ kubectl get nodes
NAME                                          STATUS   ROLES    AGE     VERSION
gke-drnic-y5p82y-default-pool-9ls0   Ready    <none>   6m58s   v1.15.11-gke.9
gke-drnic-y5p82y-default-pool-t4dv   Ready    <none>   6m58s   v1.15.11-gke.9
gke-drnic-y5p82y-default-pool-t8f3   Ready    <none>   6m58s   v1.15.11-gke.9
Static IP
Next, we want a static IP. We need an IP address for incoming traffic to our Cloud Foundry API and to our apps. And we want it to be static so it doesn’t change each time we tear down and rebuild our cluster.
$ gcloud compute addresses create cf-for-k8s --region "$(gcloud config get-value compute/region)" --format json | jq -r '.[].address'
34.83.153.141
DNS
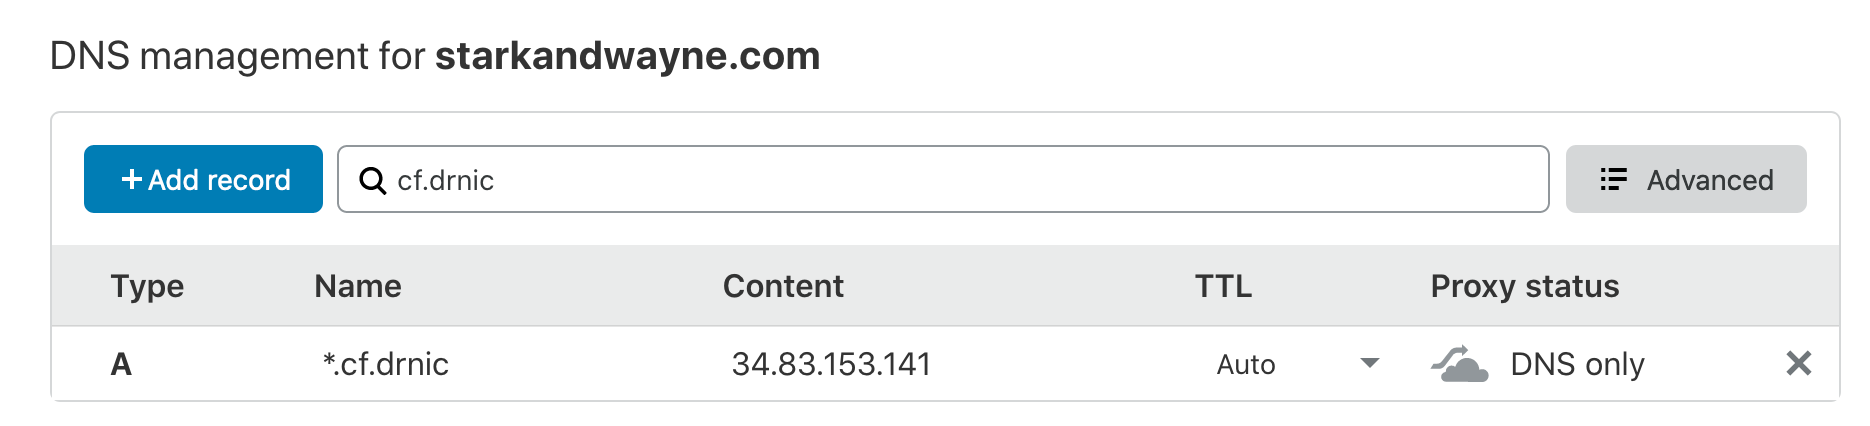
Add a wild-card DNS A record entry to your IP address. In my example, I’m setting up *.cf.drnic.starkandwayne.com to my IP using CloudFlare.
Configuring Cloud Foundry
With five minutes remaining, we will now host Cloud Foundry on our GKE cluster.
The running Cloud Foundry will use Kubernetes to run apps, build source code into images, route HTTP traffic, stream logs, and more.
Cloud Foundry is now a Kubernetes deployment. We need to generate some random secrets, build the YAML, and deploy it.
git clone https://github.com/cloudfoundry/cf-for-k8s
cd cf-for-k8s
mkdir -p config-values tmp
./hack/generate-values.sh -d cf.drnic.starkandwayne.com > config-values/cf-values.yml
This wrapper script uses the bosh CLI for its handy ability to generate secrets and certificates into a YAML file.
The cf-values.yml will include passwords and x509 certificates based on your system domain. If you change your system domain, remember to regenerate your certificates.
To use your static IP, create the file config-values/static-ip.yml:
#@data/values
---
istio_static_ip: 34.83.153.141
Google Container Registry
The running Cloud Foundry will be able to build developer’s source code into OCI/Docker images. We will use Google Container Registry (GCR) to store and retrieve these images.
Your Cloud Foundry developer users won’t see or touch GCR nor the images. Only Cloud Foundry and Cloud Foundry platform admins (you) will have access to it.
To create a Google service account and grant it permission to read/write to GCR (thanks to https://stackoverflow.com/a/56605528/36170 for the gcloud commands):
export PROJECT="$(gcloud config get-value project)"
export KEY_NAME=cf-for-k8s
gcloud iam service-accounts create ${KEY_NAME} --display-name ${KEY_NAME}
gcloud iam service-accounts keys create --iam-account ${KEY_NAME}@${PROJECT}.iam.gserviceaccount.com tmp/gcloud-key.json
gcloud projects add-iam-policy-binding ${PROJECT} --member serviceAccount:${KEY_NAME}@${PROJECT}.iam.gserviceaccount.com --role roles/storage.admin
A secret tmp/gcloud-key.json file is created.
To use GCR with your service account key, create a file config-values/app-registry.yml:
#@data/values
---
app_registry:
   hostname: gcr.io
   repository: gcr.io/drnic-257704/cf-for-k8s/cf-workloads
   username: _json_key
   password: |-
     {
       ... paste in contents of tmp/gcloud-key.json ...
     }
Note: it is password: |- and not password:. The vertical bar means that the subsequent lines are part of a multiline string, not YAML/JSON data.
The example repository: value above is composed of:
gcr.io– the hostname for GCRdrnic-257704– my Google Cloud project IDcf-for-k8s/cf-workloads– an arbitrary path where Cloud Foundry will store all images for all applications that are deployed.
You can also generate this file by running the following command (thanks Ruben Koster for the snippet):
cat << YAML > config-values/app-registry.yaml
#@data/values
---
app_registry:
  hostname: gcr.io
  repository: gcr.io/$(gcloud config get-value project)/cf-for-k8s/cf-workloads
  username: _json_key
  password: |
$(cat tmp/gcloud-key.json | sed 's/^/    /g')
YAML
We will revisit GCR in the browser later when we’ve deployed our first application, and Cloud Foundry stores its first image in GCR.
Starting Cloud Foundry
At this point, we are inside the cf-for-k8s repository, and inside the config-values folder are three files: cf-values.yml, static-ip.yml, and app-registry.yml. Inside tmp folder is gcloud-key.json.
We are not going to use Helm, which you might be familiar with to compose YAML from values. Instead, we will use ytt. It has many nice features for building large sets of YAML documents, such as for a large Kubernetes deployment.
To build all the YAML that describes our Cloud Foundry deployment:
ytt -f config -f config-valuesAt the time of writing, for cf-for-k8s v0.1.0, this produces 14,000 lines of YAML. Enjoy.
You could now pipe this ytt command into your favourite “run this YAML on Kubernetes tool”.
For example, kubectl apply:
ytt -f config -f config-values | kubectl apply -f -But, let’s try another new tool kapp that will progressively show us the success almost 250 Kubernetes resources.
kapp deploy -a cf -f <(ytt -f config -f config-values)This will produce a long list of resources to be created (since we are deploying Cloud Foundry for the first time), and conclude with a yes/no prompt:
Op:      245 create, 0 delete, 0 update, 0 noop
Wait to: 245 reconcile, 0 delete, 0 noop
Continue? [yN]:
Press y to continue.
The kapp deployment tool will then wait for all 36 CRDs to be installed, then move on to wait for 42 namespaces, cluster roles, policies, and webhooks, to be successfully installed. Then it waits for the remainder of the 166 resources to complete.
It’s quite nice to see kapp progressively show the large deployment in progress.
Accessing your Cloud Foundry for the first time
To access your Cloud Foundry you will need a few things:
- The
cfCLI which is available on the internet (please upgrade if you already have it installed) - The API URL for your Cloud Foundry. This is https://api.<your system domain>. For me, this is
https://api.cf.drnic.starkandwayne.com. - The randomly generated admin secret password stored in
config-values/cf-values.yml.
To get your system domain and secret password, look at the top of cf-values.yml:
$ head config-values/cf-values.yml
#@data/values
---
system_domain: "cf.drnic.starkandwayne.com"
app_domains:
#@overlay/append
- "cf.drnic.starkandwayne.com"
cf_admin_password: wough8vdboikelwggbkw
Now we run the cf login command to target and authenticate as built-in admin user:
cf login https://cf.drnic.starkandwayne.com --skip-ssl-validation \
  -u admin -p wough8vdboikelwggbkw
You could also get fancy with bosh int --path to pluck values from the cf-values.yml inline:
cf login \
  -a "https://api.$(bosh int config-values/cf-values.yaml --path /system_domain)" \
  --skip-ssl-validation \
  -u admin \
  -p "$(bosh int config-values/cf-values.yaml --path /cf_admin_password)"
Create an org and a space. If you’re new to Cloud Foundry, think of organizations are a collections of users and apps who share domain names and billing information. Spaces are akin to Kubernetes namespaces – a useful way to isolate things and allow them to reuse names.
cf create-org test-org
cf create-space -o test-org test-space
cf target -o test-org -s test-space
To deploy a sample NodeJS app we use the famous cf push command (please upgrade your cf CLI first):
cf push test-node-app -p tests/smoke/assets/test-node-appIn another terminal you can watch the source code being converted into an OCI/Docker image using Cloud Native Buildpacks & kpack:
$ cf logs test-node-app
...
OUT Node Engine Buildpack 0.0.158
OUT Resolving Node Engine version
OUT Candidate version sources (in priority order):
OUT -> ""
OUT
OUT Selected Node Engine version (using ): 10.19.0
...
The tests/smoke/assets/test-node-app folder only contains a trivial package.json and server.js HTTP application. Cloud Foundry takes these files, combines them with a secure version of NodeJS and any npm dependencies, and creates an OCI/Docker image. It then runs the image and routes HTTP traffic.
The hostname for the application will be shown. For me it was http://test-node-app.cf.drnic.starkandwayne.com.
Where are my the application images?
The cf push command converts the simple NodeJS app into an OCI/Docker image before running the application as a set of pods. The person running cf push doesn’t care about Docker images, Pods, or Istio HTTP traffic routing. They just want their app built and running. But you care. So where are the Docker images?
Visit the Google Container Registry. If you used a gcr.io registry URL similar to mine, you’ll navigate to cf-for-k8s and then cf-workloads to find the image created by kpack:
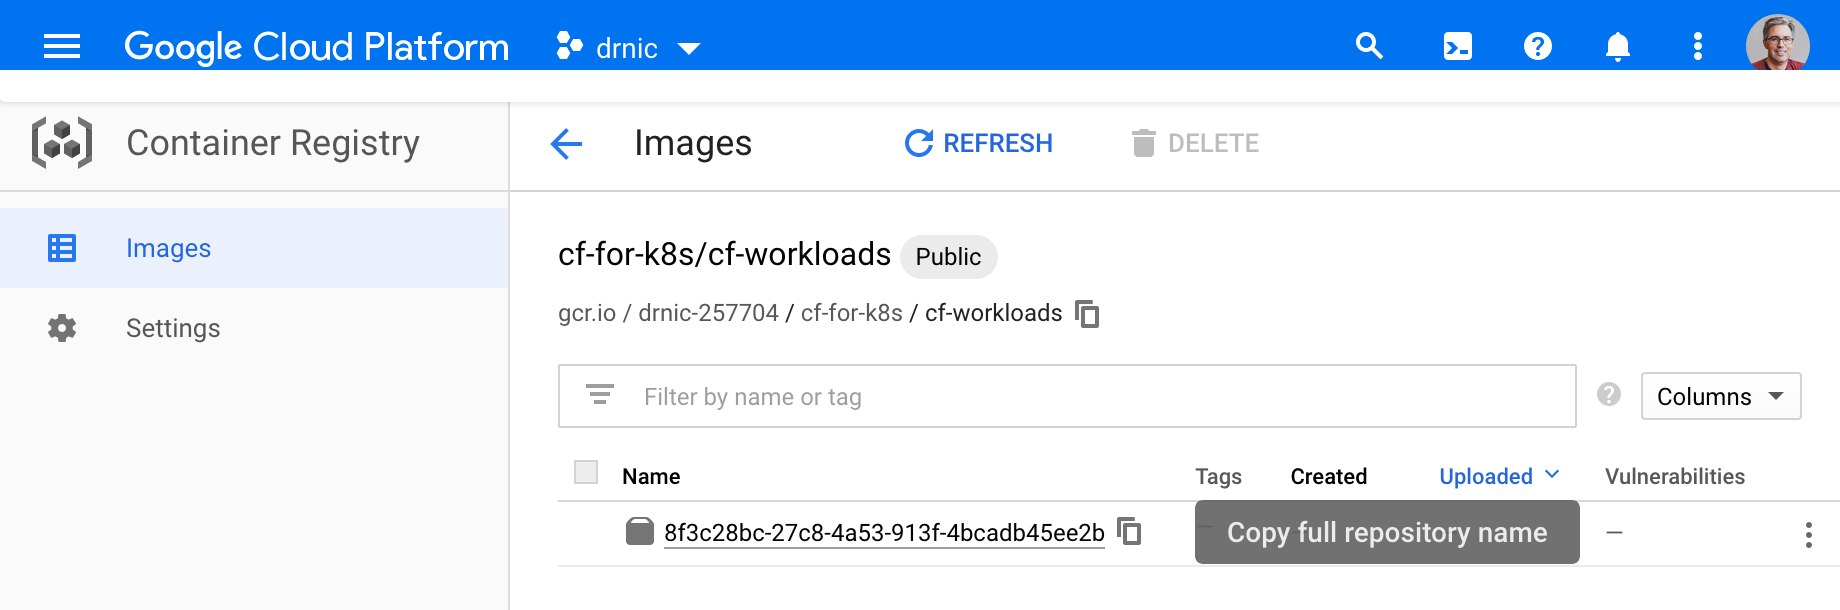
If you have Docker locally, and your Docker is authenticated to Google Container Registry, you can pull this image and run it locally. All images are runnable and HTTP traffic is on port 8080.
$ docker run -ti -e PORT=8080 -p 8080:8080 \
    gcr.io/drnic-257704/cf-for-k8s/cf-workloads/8f3c28bc-27c8-4a53-913f-4bcadb45ee2b
...
> [email protected] start /workspace
> node server.js
Console output from test-node-app
In another terminal you can access port 8080:
$ curl http://localhost:8080
Hello World
Tanzu Application Service for Kubernetes
The open source project cf-for-k8s, and all its feed in projects, are the raw materials to VMWare’s new Tanzu Application Service for Kubernetes (TAS). You can download v0.1.0 today and run it with very similar instructions above.
Dan Baskette has written up instructions for deploying TAS to Kubernetes in Docker (kind). They should feel very familiar to this blog post, and I’ve upgraded this blog post to bring it more inline with the ideas in TAS and Dan’s tutorial (I changed tmp to config-values folder name).
What’s next to learn?
I’ve had my first taste of ytt for wrangling large amounts of YAML and I quite like it. I have gone thru all of the examples in https://get-ytt.io/ and have spent time on the #k14s Kubernetes Slack channel (join at https://slack.k8s.io/) asking many questions.
I also quite like the output of kapp over the fire-and-forget-and-OMG-it-didn’t-eventually-work style of kubectl apply.
I do need to get better at Istio, which is a core part of Cloud Foundry going forward. The networking components, and how they work, are documented in https://github.com/cloudfoundry/cf-k8s-networking.
The build system for converting application source code into OCI/Docker images is called Cloud Native Buildpacks https://buildpacks.io/, and the subsystem included in Cloud Foundry to do this is kpack. Learn more about kpack on this very blog. We investigated Cloud Native Buildpacks and kpack a year ago.
The path towards cf-for-k8s 1.0 has been sketched out in early March, and includes discussion on:
- What kind of feature parity are we targeting for networking in CF-for-K8s vs CF-for-BOSH?
- Current dependency on Istio. What’s up with that?
- Migrating from CF/Diego to cf-for-k8s without downtime
There is so much more to learn and more to explain. It is an exciting future for the Cloud Foundry ecosystem – for the platform operators, vendors, contributors, and especially the developer users who love cf push.
If you would like more blog posts or YouTube videos explaining what is going on with Cloud Foundry on Kubernetes, please let us know in the comments.

Spread the word