Docker Desktop is a perfectly serviceable way to use Docker on either MacOS or Windows, but for non-trivial use cases, it leaves much to be desired.
I recently happened upon one such use case that you might think would be rather common: I develop on MacOS, but since my MacBook Pro only has 16GB of memory, I’d like to use another host – in this case, my personal Windows gaming computer, which has a whopping 32GB of memory – as a remote Docker host. I mean, how many of us hackers, nerds, and geeks out there work with our (usually) MacBook laptops during the day, but then flip over to our custom-built Windows boxes after work to blast some aliens in the face?
You’d think this would be pretty well-traveled territory by now, and thus relatively easy to achieve. But you’d be dead wrong. It turns out that getting Docker working as a local network host on Windows is anything but simple, and in fact, it apparently requires quite a lot of kludgy hodgepodge of hacks to work.
Disclaimer: I am NOT a Windows admin by any stretch of the imagination. I am fully aware that you can do pretty-much anything with Windows these days that you can with *nix operating systems in terms of configuration, services, etc., but I fully admit that I do not know current best practices to do so. If you know better, @ me.
Also, it should be painfully obvious, but don’t use this sort of setup in any mission-critical or production situation.
tl;dr summary
- Install WSL 2, then install Docker as a daemon inside that.
- Configure said daemon to listen on
0.0.0.0:2375. - Realize that WSL will force it to bind to
localhost, not0.0.0.0, no
matter what you do. - Wire up a TCP proxy running in Windows userspace to bind to
0.0.0.0:2375
and use that to shuttle traffic tolocalhost:2375. - Test connectivity from an external host to verify it works.
Docker Desktop: What NOT to do
Docker Desktop includes a simple way to make your Windows machine a Docker host (or so it would seem): a simple check box in the configuration. You’d think this is all you need, but there’s a “gotcha” here: it will only bind Docker to localhost:2375, NOT to 0.0.0.0:2375, meaning that using this option will only make Docker available over the local machine. It’ll be unreachable from anywhere else on your network using this option.
Side note: apparently Docker Desktop includes this functionality to make current versions of the daemon available to legacy
dockerCLI clients. Still, for our purposes, it’s pretty-much useless.
At first, I didn’t realize this. I used the aforementioned check-box and tried to reach Docker from another machine on my local network, to no avail. Wondering what I’d done wrong, I looked at the Windows Resource Monitor and found that the Docker Desktop application was listening on port 2375, sure enough, but that it was bound to localhost only, so it couldn’t receive traffic from anywhere else on my network.
Next, I did what any sane person would do I: I asked “The Google”™. I happened upon this article on Docker configuration that implied I could control this behavior by modifying the JSON configuration exposed in the Docker Desktop app. So naturally, I added the following to the Docker configuration:
{  "hosts": ["tcp://0.0.0.0:2375"]
}
Then, I disabled my firewall in both Windows and in my antivirus software just to rule it out as a possibility in case that didn’t work. When I restarted Docker, I checked the Network tab of the Resource Monitor again and looked for what was bound to port 2375. Yep, its Docker Desktop all right, but its still bound ONLY to localhost! Even with the right configuration according to the documentation, Docker Desktop on Windows just refuses to bind to all network interfaces, making Docker Desktop essentially useless for all but the most trivial of use cases.
Using Windows Subsystem for Linux
After a few more trial-and-error attempts to get the above working failed, out of frustration I decided to nuke the entire Docker installation from within Windows and re-install just the daemon inside WSL. Once I had that installed and configured, I reasoned, I could expose the daemon from within WSL to the network and be able to finally get some work done.
How wrong, how hopelessly wrong I was.
For the uninitiated, “WSL” stands for “Windows Subsystem for Linux” and is, quite possibly, the most amazing thing Microsoft has ever built into their flagship product. The first version of WSL added hooks/shims to the Windows kernel directly so that, when a complied Linux binary made syscalls to what it thought was the Linux kernel, the Windows kernel accepted those syscalls and redirected or re-implemented the logic that was needed in “The Windows Way” such that any Linux binary running had absolutely no idea it was running on Windows. Think virtualization without needing a hypervisor or another OS installed.
As with anything, this was less than perfect. Over time, issues began to arise that Microsoft eventually decided to address with WSL version 2: implementing an extremely lightweight, totally transparent virtual machine within Windows that allowed for the same features, just implemented in a different way. This has some tradeoffs vs. the previous version, but is, for the most part, the recommended way to go these days.
You’ll need Windows 10, preferably the most recent build version, to use WSL. You may also need the Pro edition or better (I’m not sure if Home edition is allowed to run WSL or not). You can read more about how to install it here.
Installing the daemon under Linux is straightforward enough. Docker provides excellent documentation on the install process and a great post-install guide, both of which I followed for an Ubuntu 20.04 WSL 2 install. That was simple enough, however due to the fact that WSL starts up a little different than a normal Linux distro, you don’t have a working systemd so you’ll need to figure out another way to auto-start the Docker daemon.
Once everything’s installed and configured, you can launch the docker daemon manually by running dockerd as root.
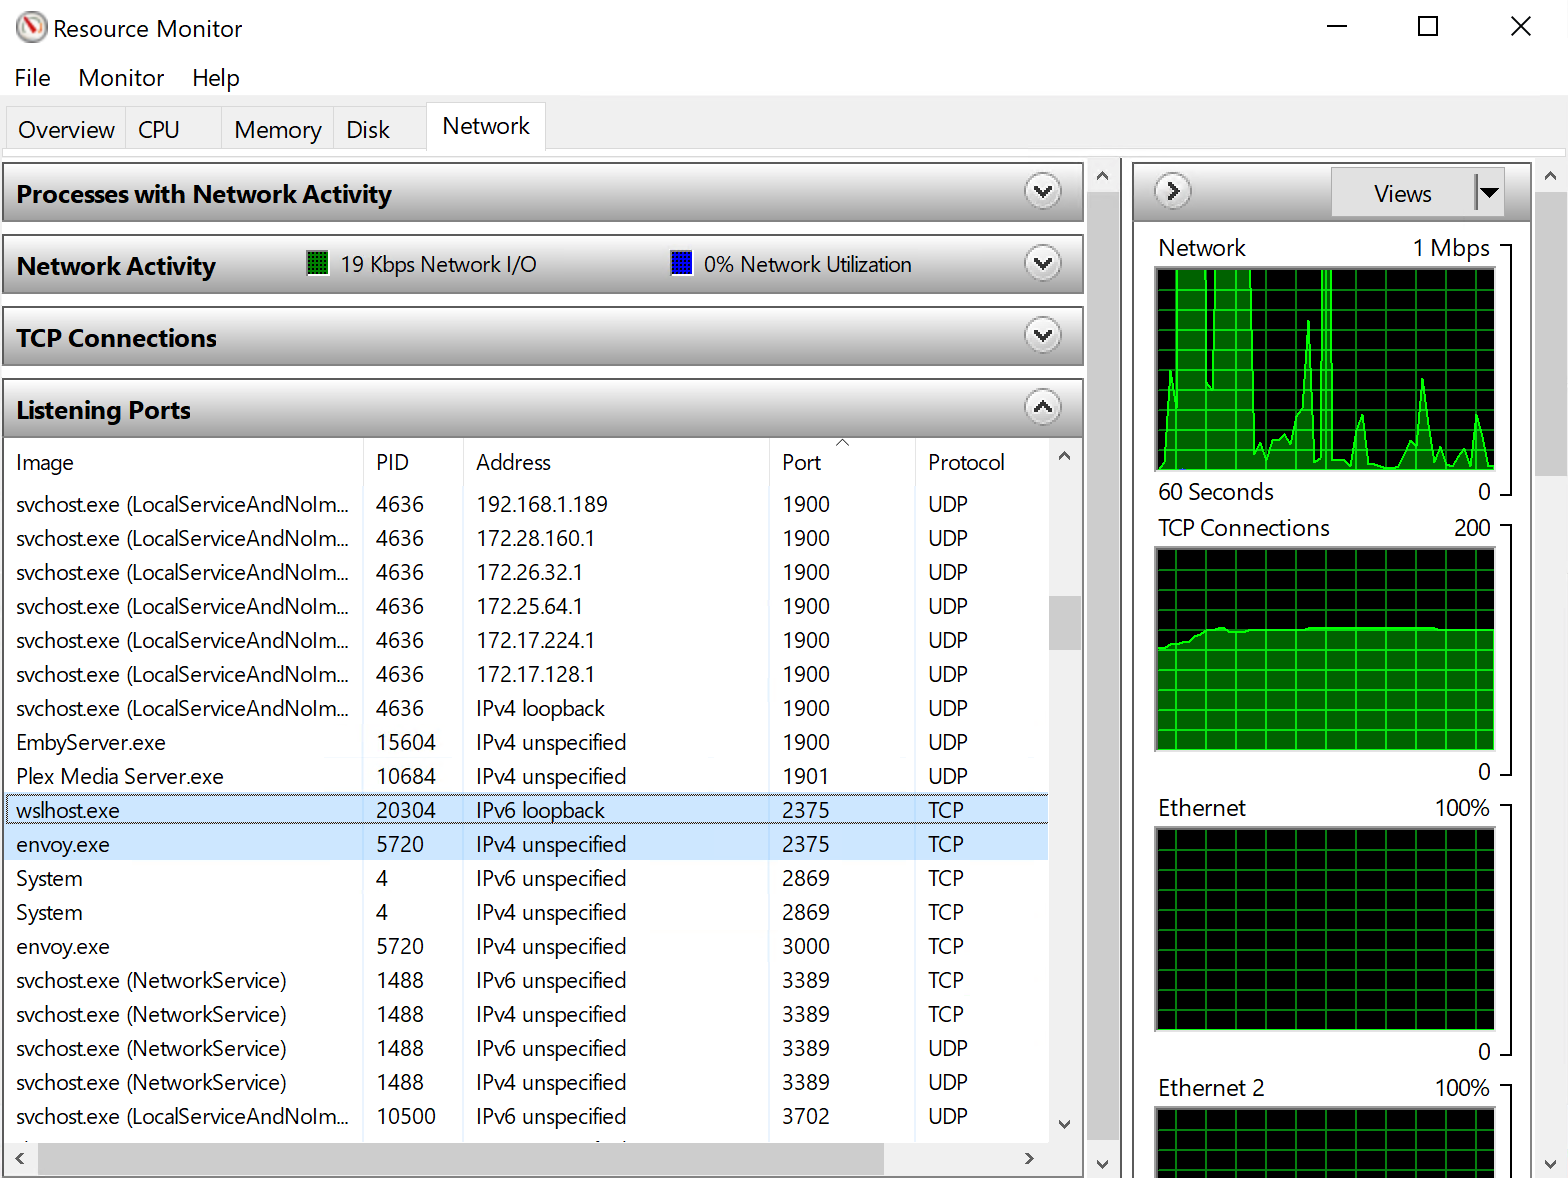
However, if you review the Network tab of the Windows Resource Monitor, you won’t see dockerd anywhere. Instead, that’ll be under the process wslhost, which will be bound only to local loopback. No matter what you do, WSL will not allow you to expose processes inside of it to the network directly. We’re still stuck with local loopback only.
So, more magic will be needed to get things working. How about a TCP proxy?
Sticking a Proxy In Front: An Exercise in Madness
At this point I realized there was no way I would ever get Docker exposed to the entire network directly, so I resolved to put a TCP proxy in front of it. “As long as it’s just blindly shuttling traffic back and forth,” I reasoned, “the docker CLI won’t even know the difference.”
So, what proxy should we put in place? I had experience with HAproxy, but it looks like they don’t have a build for Windows. I needed something in the Windows user space, so that was out.
The other proxy I was familiar with was Envoy, so I looked at their website to see if they had a Windows build available. It turns out that the “documentation” (such as it is) for running Envoy on Windows tells you to compile it from source (at the time this happened; hopefully this changes in the future) and I had neither the time, nor patience, to install a massive Windows development environment just to build Envoy once. That seemed kind of insane.
After some more looking around, I found their FAQ, which linked to this document as the place to download binaries. Only one problem: they’re all Docker images! So I’d need Docker to run Docker?!
That made zero sense, so I looked at the project’s GitHub releases — no luck. So, I started looking at the project’s “issues” to see if anyone else had asked for some help in getting a pre-compiled Windows release, hoping maybe they got a useful answer.
Unfortunately, the most useful response on the issue of providing pre-built Windows binaries for Envoy was this response from one of the maintainers:
See https://www.envoyproxy.io/docs/envoy/latest/faq/binaries. We don’t provide binaries, but you can copy them out of the docker container if you want.
The thread does go on, and there are links provided to documentation and a tool for downloading Envoy on Linux machines, but any mention of Windows is entirely missing from any of the documentation that’s been linked (as of the time of this writing), making the responses in that thread entirely pointless.
And with that, I was off to go rip apart a Docker image.
Doing Ungodly Things With Docker Images
In my personal opinion, using Windows for development and/or terminal-based work/workflows is still a pain. It’s just not a smooth experience, not to mention I’d have to re-install about a bajillion different things, and configure a ton more, just to get a decent workflow set up.
So, I proceeded to grab the official Envoy Docker Image for Windows from Docker Hub while on my Mac (using Docker desktop which was eating over 80% of my memory at the time, just to pull images):
$ docker pull envoyproxy/envoy-windows
Using default tag: latest
Error response from daemon: manifest for envoyproxy/envoy-windows:latest not found: manifest unknown: manifest unknown
All right, fine Docker, be difficult. Let’s just force the most recently published version as the tag:
$ docker pull envoyproxy/envoy-windows:v1.18.2
v1.18.2: Pulling from envoyproxy/envoy-windows
4612f6d0b889: Downloading
5ff1512f88ec: Downloading
ecaafce5c67e: Pulling fs layer
d507bef22a1e: Waiting
9bdb36426121: Waiting
e5b3f220cc68: Waiting
e5410c30e7a9: Waiting
4b47829da3b1: Waiting
35eb096aecb4: Waiting
68a2a4ec685d: Waiting
9c1c360fc8b3: Waiting
a08a596feca8: Waiting
image operating system "windows" cannot be used on this platform
…aaaaaand, nope. Docker won’t even let you pull the image if there’s a mismatch between the host and container operating systems.
After cursing the gods, I decided I wasn’t going to give up. I remembered that Docker images are just big tarballs, so I should be able to just download the flat tarball image from Docker Hub and, in theory, unpack it somewhere to browse the filesystem of what would otherwise be a Windows image.
As it turns out, this isn’t so easy. There are a lot of custom headers and and tokens involved in retrieving a Docker image, and it’s not easy to do manually. Luckily, I stumbled on this script from the Moby project that did exactly what I needed! I retrieved the script and ran it to fetch the Windows Envoy image:
$ ./script.sh win envoyproxy/envoy-windows:v1.18.2
Downloading 'envoyproxy/envoy-windows:[email protected]' (12 layers)...
<snip>
Download of images into 'win' complete.
Use something like the following to load the result into a Docker daemon:
  tar -cC 'win' . | docker load
Note: If you get an error message complaining that ‘mapfile’ is not found, you may need to upgrade your version of Bash. MacOS ships with an old version that’s two major releases behind. Alternatively, you could run this on your WSL machine which may already have an updated version of Bash available.
Now, we can browse the win/ directory that this script created for us:
$ ls win
Permissions Size User Date Modified Name
drwxr-xr-x     - jah   4 May 15:42  1a5606bb70dc20fb56456b2583d295bdd2e847c0617da3da68d152bdd6a10b78
drwxr-xr-x     - jah   4 May 15:42  4e6cb5497aca4d83d2b91ef129fa823c225b0c76cefd88f5a96dd6c0fccdd6c7
drwxr-xr-x     - jah   4 May 15:42  6bfb8784732bcc28ef5c20996dbe6f15d3a004bf241ba59575b8af65de0a0aaf
drwxr-xr-x     - jah   4 May 15:42  3712aa599c08d0fb31285318af13e44d988391806d2460167643340c4f3a7123
drwxr-xr-x     - jah   4 May 15:42  698765937dc05ffcc458d8c2653563450bc169a724c62ed6a2c58f23c054b0ff
drwxr-xr-x     - jah   4 May 15:42  a4c3f3e7cef6cd7492338a26b7b307c0cd26e29379655f681d402c1eeaf595b6
drwxr-xr-x     - jah   4 May 15:42  b93d56fb00e644574bb7c2df769bb383d7fa351730393d46239078026bbc8efc
.rw-r--r--  3.7k jah   4 May 15:42  b775d72f61762e116864ab49adc8de32045e001efd1565c7ed3afe984d6e07f0.json
drwxr-xr-x     - jah   4 May 15:42  c42480d1b057b159309c4e55553ba75d84c21dc6c870f7ed77b0744c72e755f5
.rw-r--r--  3.7k jah   4 May 15:40  d00ba7ba582355550f5e42f453d99450754df890dec22fc86adb2520f3f81da2.json
drwxr-xr-x     - jah   4 May 15:42  d59df72a9d52b10ca049b2b6b1ce5b94f6ebb8a100ec71cea71ec7d8c0369383
drwxr-xr-x     - jah   4 May 15:43  d8067d34f431844ea7a3068d31cdb9254f1fcb93bcaf1c182ceebdec17c8d1fc
drwxr-xr-x     - jah   4 May 15:42  ea8955ac8603cc8dbb34e70e0922b59271522839db7d626e0f79f45b954c0d12
drwxr-xr-x     - jah   4 May 15:42  ec233e633fbbcbaf9d6f7ba3496ebc676f9b70ac4b95ba1127c466723976f55a
.rw-r--r--  1.2k jah   4 May 15:43  manifest.json
.rw-r--r--    51 jah   4 May 15:43  repositories
After poking around each directory one-by-one and decompressing layer.tar that was found in each, I eventually found what I was looking for:
$ cd 3712aa599c08d0fb31285318af13e44d988391806d2460167643340c4f3a7123
$ tar xf layer.tar && chmod -R 777 * && tree .
tree .
.
├── Files
│   ├── Documents\ and\ Settings -> [Error\ reading\ symbolic\ link\ information]
│   └── Program\ Files
│       └── envoy
│           └── envoy.exe
├── Hives
│   ├── DefaultUser_Delta
│   ├── Sam_Delta
│   ├── Security_Delta
│   ├── Software_Delta
│   └── System_Delta
├── VERSION
├── json
└── layer.tar
4 directories, 10 files
Finally! We found envoy.exe!
After copying envoy.exe out of the container tarball, now I could write a configuration file to proxy TCP traffic from 0.0.0.0:2375 to local loopback on the same port. That config file wound up looking about like this:
static_resources:
  listeners:
    - name: docker-proxy
      address:
        socket_address:
          address: 0.0.0.0
          port_value: 2375
          protocol: TCP
      filter_chains:
        filters:
          - name: envoy.filters.network.tcp_proxy
            typed_config:
              "@type": type.googleapis.com/envoy.extensions.filters.network.tcp_proxy.v3.TcpProxy
              cluster: docker-actual
              stat_prefix: docker-proxy
  clusters:
    - name: docker-actual
      connect_timeout: 1s
      type: STATIC
      load_assignment:
        cluster_name: docker-actual
        endpoints:
          - lb_endpoints:
            - endpoint:
                address:
                  socket_address:
                    address: 172.25.65.236
                    port_value: 2375
                    protocol: TCP
admin:
  address:
    socket_address:
      address: 0.0.0.0
      port_value: 9901
Important note: Every time WSL launches, it assigns a different IPv4 address to itself. One thing I haven’t figured out just yet is how to get it to always use the same IP address. You’ll need to get your WSL IP address by running
ifconfig eth0from within a WSL shell and substitute your IP for the one in my example configuration. You’ll need to do this every time you reboot, and/or every time you stop and start WSL.
Start it Up
With Envoy finally ready to go, we can start everything up and test it. On my Windows machine I launched a shell into WSL and ran the Docker daemon manually:
$ sudo dockerd --tls=false &
Then, in another terminal window, I launched a Powershell session and ran Envoy:
PS J:\envoy> .\envoy.exe -c .\envoy.yaml
If all is working as it should, you should be able to see that wslhost is bound to the local loopback on port 2375, and that envoy.exe is bound to “IPv4 unspecified” on 2375 as well:
Now I was finally able to use a computer with some significant hardware as my Docker host. All that remained was to export the environment variable and use it!
$ export DOCKER_HOST=<ip of windows box>
$ docker ps
CONTAINER ID   IMAGE     COMMAND   CREATED   STATUS    PORTS     NAMES
Success!
Closing Thoughts
In case it wasn’t obvious, what I did here should NEVER be done in a production situation. This was purely for my own use on my own network for development and testing purposes only.
The setup described herein relies quite a bit on manual work. Every time you reboot the host, you’ll need to dig up the internal IPv4 address for WSL, change that entry in the Envoy configuration, start up dockerd within WSL and launch envoy.exe again to connect everything. Right now I’m doing this by hand since, fortunately, I don’t have to reboot that Windows machine all too often. That said, I do plan on finding ways to automate the launch of that stuff every time I boot the computer up. I believe that can be accomplished with a BAT file that you call through a Windows “Scheduled Task” (see Task Scheduler app) every time you start the computer, prior to login.
This process was way harder than it needed to be. From the Windows Docker Desktop application refusing to honor the hosts configuration array, to the Envoy project claiming they have a Windows release of their proxy but making it so incredibly hard to retrieve, to the way Microsoft refuses to expose processes bound to ports in WSL to the network by default, this was a major pain in the posterior. It’s fair to criticize all three companies involved here in how hard they’ve made it just to do what should otherwise be a very simple thing. It’s also fair to say that none of this would be possible without the fine job the people at these aforementioned places have done in building excellent tools that allow people like myself to accomplish such feats of “Mad Science” as this.
One thing I will admit, though, is that it wasn’t necessary to remove the Docker Desktop application from Windows, since the daemon we installed within WSL wound up being bound only to local loopback anyway. In theory, at least, you should be able to do all of this without using WSL at all (minus retrieving the Envoy Docker image, you need a recent-ish version of bash for that). The important words above here are “in theory” – I haven’t tested this with the Docker Desktop app for Windows, and have no idea what additional headaches one might run into should they try to use it in this way.
None of this would have been necessary, however, if either:
- Apple shipped their default MacBook Pro laptops with more than 16GB of RAM, or;
- Docker didn’t require an entire VM with dedicated resources to “fake” the notion of containers on MacOS.
But, we don’t live in a perfect world.

Spread the word