One of the greatest devops tools in 2017 will be BOSH – the outer shell for cloud software. I recently summarized why BOSH is still unique in our profession in an article BOSH turns five! If you’re intrigued, you might want to know how to get started? Or how to do something useful?
In this article, we will bootstrap BOSH 2.0 on Amazon AWS, and deploy a 5-node Zookeeper cluster. 95% of the instructions are for BOSH (it needs all the AWS credentials/networking info), and 5% of the effort is the Zookeeper cluster. Exciting stuff!
Alternately, you might want to start with BOSH 2.0 on your laptop using Virtualbox. See our previous article Bootstrap BOSH 2.0 with local VirtualBox. The instructions at the end for deploying zookeeper are 100% the same regardless of deploying to AWS or Virtualbox.
The instructions and colourful commentary in this article are based on the BOSH Core team’s wonderful new repository bosh-deployment. BOSH is so lovely to use these days.
Terminology
"Bootstrap BOSH" or "Deploy BOSH" refers to bringing up a single VM that runs the BOSH Director and its runtime dependencies (like PostgreSQL). This is the bosh create-env command featured in this article.
"Use BOSH" normally refers to using the bosh in the terminal, which in turn talks to the BOSH Director via its HTTPS API. "Deploy with BOSH" refers to the bosh deploy command which is used at the end of the article to deploy Zookeeper.
Getting started
The bosh CLI can be installed on OS X via homebrew. At the time of writing, you may want to alias it from bosh2 to bosh:
brew install cloudfoundry/tap/bosh-cli
alias bosh=bosh2
The command we will use to bootstrap our BOSH Director VM is bosh create-env. It needs configuration – which infrastructure will it deploy the VM to? Which infrastructure will the resulting BOSH VM then deploy subsequent systems to (probably the same one, but there is a two-step distinction)? what IP/subnet/server size etc will be used?
To radically simplify all these choices, the BOSH Core team have heroically created the https://github.com/cloudfoundry/bosh-deployment project.
git clone https://github.com/cloudfoundry/bosh-deployment
cd bosh-deployment
At the time of writing the root folder is a little messy, so I’ll simplify it for you with the most important files for bootstrapping BOSH to AWS:
.
├── bosh.yml
├── external-ip-with-registry-not-recommended.yml
├── aws
│   ├── cloud-config.yml
│   └── cpi.yml
These are the files we’ll use to bootstrap BOSH 2.0 to AWS in this article and set it up. Are the other files useful? Yes. But not in this article. Not today, grasshopper.
Run the following commands to kick things off (be ready for the educational error messages coming):
name=aws-demo
touch tmp/aws-demo-vars.yml
bosh create-env bosh.yml \
  --ops-file   aws/cpi.yml \
  --ops-file   external-ip-with-registry-not-recommended.yml \
  --state      tmp/aws-demo-state.json \
  --vars-store tmp/aws-demo-creds.yml \
  --vars-file  tmp/aws-demo-vars.yml
This will error. Or rather, it will tell you what additional information it would like, before you try again.
You’ll be told the big list of AWS information that you’ll need to provide:
Started validating
Failed validating (00:00:00)
Parsing release set manifest '/Users/drnic/Projects/bosh_deployments/bosh-deployment/bosh.yml':
  Evaluating manifest:
    - Expected to find variables:
        - access_key_id
        - az
        - default_key_name
        - default_security_groups
        - director_name
        - external_ip
        - internal_cidr
        - internal_gw
        - internal_ip
        - private_key
        - region
        - secret_access_key
        - subnet_id
Let me regroup each one and document/give an example of what value you’ll need.
Fill out the tmp/aws-demo-vars.yml file:
director_name: bosh-aws-demo
access_key_id:     <MAGIC_AWS_ACCESS_KEY>
secret_access_key: <SECRETIVE_AWS_SECRET_KEY>
region:    us-east-1
az:        us-east-1b
subnet_id: subnet-c5f642ef
internal_cidr: 10.11.0.0/24
internal_gw:   10.11.0.1
internal_ip:   10.11.0.7
external_ip:   52.1.2.3
default_security_groups: [bosh-sg]
default_key_name: bosh-aws-demo
private_key: |-
  -----BEGIN RSA PRIVATE KEY-----
  MIIEowIBAAKCAQEAskEl+ztj8zRtV1uJHuO2hr7WmFbMTjxx6oMNMMk6ihCeed9Q6eENwV8M1EBR
  ...
  xYv8oiqU1t7qWQ4GQKZl7wLqSmwbjVKNAThqDOuNMXcOxeCRURoXPxxnOphLGSO1x2E2
  -----END RSA PRIVATE KEY-----
At the time of writing https://bosh.io/docs/init-aws.html contains lots of screenshots of how to create/find this information with the AWS Console. This documentation page is for the precursor bosh-init command; we’re using bosh create-env now. But the AWS information looks good.
If any of the fields above are confusing, let me know in the comments and I’ll add extra explanation. Perhaps screencast would be helpful. Let me know.
Run the bosh create-env command again.
bosh create-env bosh.yml \
  -o aws/cpi.yml \
  -o external-ip-with-registry-not-recommended.yml \
  --state      tmp/aws-demo-state.json \
  --vars-store tmp/aws-demo-creds.yml \
  --vars-file  tmp/aws-demo-vars.yml
Waiting
The first time you bosh create-env (this might be your second time if you followed the Bootstrap BOSH 2.0 with local VirtualBox article already) you may have some waiting to do. A few 100Mb of assets will be downloaded and cached to your machine. Avoid slow internet and/or Australia.
Started validating
  Downloading release 'bosh'... Skipped [Found in local cache] (00:00:00)
  Validating release 'bosh'... Finished (00:00:00)
  Downloading release 'bosh-aws-cpi'... Skipped [Found in local cache] (00:00:00)
  Validating release 'bosh-aws-cpi'... Finished (00:00:00)
  Validating cpi release... Finished (00:00:00)
  Validating deployment manifest... Finished (00:00:00)
  Downloading stemcell... Skipped [Found in local cache] (00:00:00)
  Validating stemcell... Finished (00:00:00)
Finished validating (00:00:01)
One day your output will look like mine – Skipped [Found in local cache]. You will feel the speeeed of not having to download large things to your machine.
Next, bosh create-env will build the "Cloud Provider Interface" (CPI) module for talking to AWS (see bosh_aws_cpi below). At the time of writing the AWS CPI was written in Ruby, so you’ll also see it compiling its own copy of Ruby (see ruby_aws_cpi below). Relax, you have nothing to do.
Started installing CPI
  Compiling package 'ruby_aws_cpi/5e8696452d4676dd97010e91475e86b23b7e2042'... Finished (00:02:28)
  Compiling package 'bosh_aws_cpi/c2563067cbc20e3406ea36ca2984df2f0eaebcb0'... Finished (00:01:14)
  Installing packages... Finished (00:00:01)
  Rendering job templates... Finished (00:00:00)
  Installing job 'aws_cpi'... Finished (00:00:00)
Finished installing CPI (00:03:44)
The next stage is quick for AWS: downloading the "stemcell". For AWS this is merely a tiny file referencing all the pre-built AMIs on each AWS region. BOSH uses its own machine images for new VMs so that they have a BOSH agent and other software preinstalled and configured.
Starting registry... Finished (00:00:00)
Uploading stemcell 'bosh-aws-xen-hvm-ubuntu-trusty-go_agent/3312.15'... Finished (00:00:10)
NOTE: you might notice external-ip-with-registry-not-recommended.yml has a big not-recommended in it. Let’s discuss that another day. For now, we want to be able to access our BOSH VM from our laptop. We need that file included.
Started deploying
  Creating VM for instance 'bosh/0' from stemcell 'ami-fcb05dea light'... Finished (00:00:53)
Action time! bosh create-env uses the AWS CPI to provision a new VM using the corresponding AMI for the target region.
Waiting for the agent on VM 'i-008b2c9af3c22e220' to be ready... Finished (00:03:17)
I am unsure why it took 3 minutes for the agent on the new VM to be "ready". I should ask about that. Moving on…
Rendering job templates... Finished (00:00:05)
In order to "fail fast", all the inputs you provided are converted into startup scripts, config files, etc. If you missed a property then it will fail here so as to allow you to fix it (and then run the same bosh create-env command again as above).
  Creating disk... Finished (00:00:18)
  Attaching disk 'vol-0cee02554357a2cbb' to VM 'i-008b2c9af3c22e220'... Finished (00:00:18)
Oh the magic of BOSH. Above it provisioned a new AWS EBS volume, attached it to the new VM, and then on the inside of the VM it mounts it at /var/vcap/store. Lovely.
  Compiling package 'ruby/589d4b05b422ac6c92ee7094fc2a402db1f2d731'... Skipped [Package already compiled] (00:00:08)
  Compiling package 'mysql/b7e73acc0bfe05f1c6cbfd97bf92d39b0d3155d5'... Skipped [Package already compiled] (00:00:06)
  Compiling package 'libpq/09c8f60b87c9bd41b37b0f62159c9d77163f52b8'... Skipped [Package already compiled] (00:00:00)
...
The next phase is where the downloaded assets are now uploaded to the new VM. Many of them are precompiled for your speed loving pleasure.
  Updating instance 'bosh/0'... Finished (00:00:20)
  Waiting for instance 'bosh/0' to be running... Finished (00:00:09)
OMG OMG, all the packages and components that make up a BOSH VM – the BOSH Director, PostgreSQL, etc – are now being configured and are starting up.
  Updating instance 'bosh/0'... Finished (00:00:20)
  Waiting for instance 'bosh/0' to be running... Finished (00:00:09)
  Running the post-start scripts 'bosh/0'... Finished (00:00:00)
Finished deploying (00:15:19)
Stopping registry... Finished (00:00:00)
Cleaning up rendered CPI jobs... Finished (00:00:00)
Succeeded
Done!
Target your BOSH
The primary user interaction with your new BOSH VM is with the bosh CLI used above. The bosh CLI can both deploy/update/delete a new BOSH VM; but you will use bosh CLI to deploy actual systems. That is, to do good in the world. bosh deploy is akin to World Peace in Dev Ops.
bosh --environment $(bosh int tmp/aws-demo-vars.yml --path /external_ip) \
    --ca-cert <(bosh int tmp/aws-demo-creds.yml --path /director_ssl/ca) \
  alias-env aws-demo
Flattening out the bosh int --path calls to fetch variables & secrets, the command above is:
bosh -e <public_ip> --ca-cert path/to/ca_cert.pem alias-env nice-name
bosh int tmp/aws-demo-vars.yml --path /external_ipreturns the public IP in your AWS accountbosh int tmp/aws-demo-creds.yml --path /director_ssl/careturns the randomly generated root certificate (you didn’t do this,bosh create-env --vars-storedid it for you. Thanks!<(echo foobar)will placefoobarin a temporary named file descriptor and pass that to the command
With bosh alias-env <name> you can now forget which public IP address you assigned to your BOSH VM, and with --ca-cert you no longer need to find the certificate for the https connection.
Now you reference your BOSH VM by its aws-demo name.
bosh -e aws-demo environment
The output might look like:
Using environment '52.20.173.29' as anonymous user
Name      bosh-aws-demo
UUID      4628f2c5-cf24-46fe-a7bd-b3ae7503f570
Version   260.5.0 (00000000)
CPI       aws_cpi
Features  compiled_package_cache: disabled
          dns: disabled
          snapshots: disabled
User      (not logged in)
Succeeded
Note: anonymous user and not logged in. Let’s log in.
The command bosh log-in will ask you for your password. You don’t know what your password is since it was randomly generated for you. To get your password:
bosh int tmp/aws-demo-creds.yml --path /admin_password
To login to your BOSH VM:
bosh -e aws-demo log-in
Your username is admin and the password comes from bosh int tmp/aws-demo-creds.yml --path /admin_password above.
The bosh CLI will now cache your credentials and bosh -e aws-demo <command> will no longer require you to login each time.
Use your AWS BOSH
We have some additional articles where you will now get to use your BOSH VM for good. World peace. Reduce global warming. Probably.
More helpful articles are coming. Deploy simple Docker containers. Deploy Kubernetes-distribution Kubo.
Initially a BOSH director does not know what networks, disk types, vm types are available nor how a user would like to label them. We configure BOSH using "cloud-config":
bosh -e aws-demo update-cloud-config aws/cloud-config.yml \
  --vars-file tmp/aws-demo-vars.yml
Update a "stemcell" to your BOSH Director. It represents a list of known AWS AMIs for each region that have the BOSH Agent preinstalled on it.
bosh -e aws-demo upload-stemcell https://bosh.io/d/stemcells/bosh-aws-xen-hvm-ubuntu-trusty-go_agent
Deploy something, quick!
Say you want a 5-node Zookeeper cluster for a dinner party.
git clone https://github.com/cppforlife/zookeeper-release tmp/zookeeper-release
bosh -e aws-demo -d zookeeper deploy tmp/zookeeper-release/manifests/zookeeper.yml
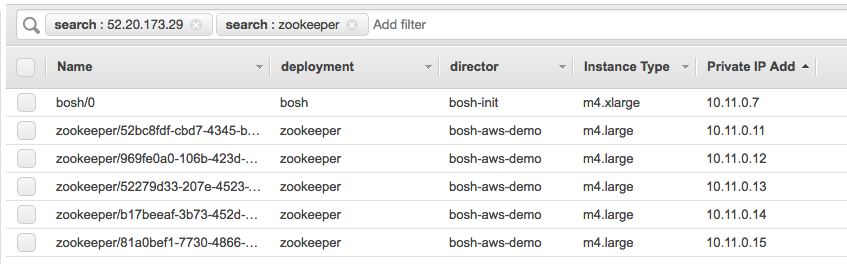
What was just deployed? Five AWS servers were just deployed and a big Zookeeper cluster is running on them!
To see the results:
bosh -e aws-demo instances
The output will be similar to:
Instance                 Process State  AZ  IPs
smoke_tests/274cc8b8...  -              z1  -
zookeeper/52279d33...    running        z2  10.11.0.13
zookeeper/52bc8fdf...    running        z1  10.11.0.11
zookeeper/81a0bef1...    running        z3  10.11.0.15
zookeeper/969fe0a0...    running        z1  10.11.0.12
zookeeper/b17beeaf...    running        z2  10.11.0.14
Leave a comment if you’d like to see an article on "How do I deploy XYZ?".
Delete your BOSH
First, think about what you’re doing. Think about World Peace.
Secondly, delete each individual BOSH deployment (such as Cloud Foundry or Kubo) before you delete your BOSH Director VM. BOSH is a lot better at deleting things than you. Let it do it.
bosh -e aws-demo deployments
bosh -e aws-demo -d zookeeper delete-deployment
Next, delete all remote assets (like orphaned persistent disks):
bosh -e aws-demo clean-up --all
Finally, to delete the BOSH VM you run the exact same bosh create-env command with all the same flags/options, but with bosh delete-env command instead.
bosh delete-env bosh.yml \
  -o aws/cpi.yml \
  -o external-ip-with-registry-not-recommended.yml \
  --state      tmp/aws-demo-state.json \
  --vars-store tmp/aws-demo-creds.yml \
  --vars-file  tmp/aws-demo-vars.yml
OR… continue deploying
Next you can deploy Cloud Foundry, and more. Continue our series of articles on BOSH 2.0:
- Running Cloud Foundry with BOSH 2.0
- Adding Docker-based services to your Cloud Foundry with BOSH 2.0

Spread the word